Two weekends ago I bought some chicken when grocery shopping. Not the frozen kind that lasts forever if you keep it frozen, the raw squishy kind that you need to either cook or freeze before it becomes unsafe.
I swear I meant to cook it within a day or so but see, I put it in the fridge and it immediately joined the list of things I forgot about because I could no longer see it. And because it wasn’t super visible immediately upon the fridge door opening I didn’t remember it was in there. I put it on top of the egg carton, I eat eggs regularly so thought that was a good spot, but what do you know I ended up eating more tofu the past little while and didn’t go for the eggs.
Oops?
My concussion strongly affects my memory and not in a good way. If I put something down and walk away to do another task within a minute I forget where I put the initial object, and when I go searching for it I can scan over the area where it is multiple times before I actually see it. I also just full on forget where something gets put, which has been a real treat to deal with considering I spent the bulk of the worst part of my concussion moving and trying to unpack. There are still so many things that I have no idea where I put them…
At one point I bought a new tv remote because I couldn’t remember seeing mine while unpacking, all boxes had been emptied or at least fully gone through, and I had no remote. I figured something has to get lost in a move and that must be it so I bought a replacement from Amazon and then of course proceeded to find my original remote after the one from Amazon arrived. Because of course. The amazing hiding spot I put it? On top of my dresser and then a piece of paper ended up on top of it and boom! Remote no longer exists in my brain. Why didn’t I, in all my searching, move the piece of paper to see what was under it? I have no idea.
So yeah, all this to explain why I immediately forgot about the chicken after putting it in the fridge and didn’t see it whenever I opened the fridge.
Yesterday I found the chicken and decided to cook it, sorta skipping over the fact that the best before date was 4 days prior. Those are just suggestions, right?
To add to this little scenario I still can’t taste or smell, so until I get sick from something I’ve eaten I don’t actually know that something I’ve eaten has gone off. Go long covid go 😛
In the end I overcooked the chicken out of a healthy dose of concern, I really didn’t want to be sick, and managed to have a perfectly acceptable dinner of veggies and chicken. Boring? Kinda. Can I tell? Nope.
I bought some ground beef this past weekend but that I actually remembered to put in the freezer so I’m safe there, now all I have to do is remember next week that I have it and want to cook it…
Well, it’s always good to know for sure the smoke detector works, right? Mine, in case you were wondering, works perfectly, maybe even a little too perfectly.
I realized today, on day 4 of avoiding humanity, that I don’t need to have a quick bowl of cereal or oatmeal for breakfast but that I could take my time and make something. I intended to make egg on toast but somehow that changed to pancakes.
When I organized the pantry yesterday I pulled out an open box of Aunt Jemima pancake mix. I left it out because there was not much left in the box, so today when I saw the box on the counter it felt like pancakes were meant to be. The universe told me so!
However, according to the box you need 1 1/4 Cups of the mix and I only had 1/4 Cup. A tad short. Instead of doing math to figure out how much I had to cut the milk and egg down to I topped up the mix with Kodiak Cake Mix.
In total I used one cup of combined pancake and kodiak mix, one egg (because why not?) and almost one cup of water. In retrospect I should have either used less water or more kodiak mix, or even just cut the egg I suppose. But I didn’t, and the end result was the runniest pancake mix I’ve ever seen.
I am a fluffy thick pancake type of person and what I got was these…
Possibly the thinnest, most pathetic pancakes every created.
They were however edible and not being a person who likes to waste food, they were my breakfast.
I worked for a while, then went for what may become my routine mid day walk, only this time I went on a trail instead of to the library and grocery store. There’s this outdoor pool I pass that had some very happy birds in it.
The ocean is a very short distance away but some prefer the pool I guess.
After I got home and worked some more I had to start thinking about dinner. I’m used to being fed at work and this whole making all my own meals thing is not something I’m enjoying. I figured on making some mac ‘n cheese but logic dictates I hold out on that. If I cook that today, on day four, then what happens on day 12 when I’m out of all the quick stuff and am forced to ya know, cook for real? I won’t have a choice! And who knows, maybe by then places won’t be delivering, then I’ll really be screwed.
So, I dug in the freezer and came up with something to cook, like a grown-up!
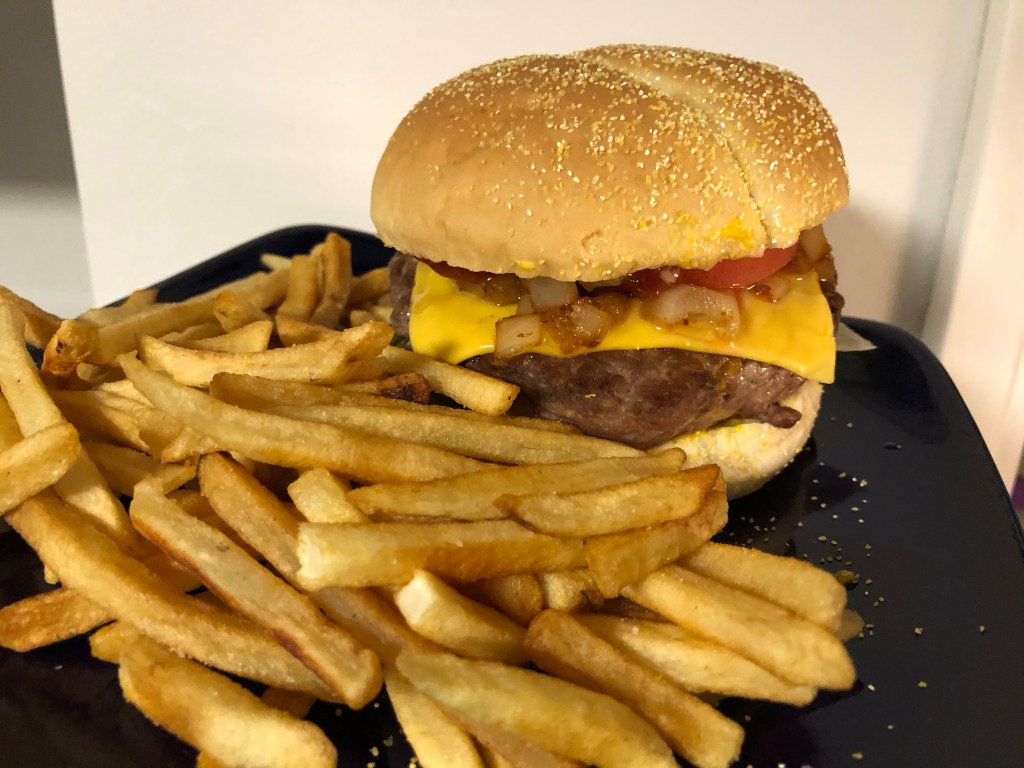
I made a jalapeño cheddar burger, with all the toppings, and fries, because every good burger needs fries.
I thought the burger would be spicier than it turned out to be but that’s ok because it tasted good and I’d rather the spicy food be tasty than be so spicy there is no flavour, ya know?
I don’t take good food pics, deal with it.
So yeah, four days in and I realized the folly of ordering in take out daily or cooking all the super easy food first. I also learned that super thin pancakes set off the smoke detector if you’re not careful. 😂
I feel before I tell this story I should point out the Instant Pot is not to blame. It did nothing wrong. This is purely user error…and a prime example of why I shouldn’t cook!
I wanted an easy chicken slow cooker dish to be able to eat throughout the week so Tuesday night I put four chicken breasts in my Instant Pot, a mix of cream of chicken soup, gravy packages, ground black pepper, and water, and turned on the slow cooker setting. I leave it to cook for 8 hours over night and when it is done it automatically changes to a keep warm setting.
It is freakishly easy and is something I have done numerous times. Not with the gravy mixture I mean, that was new, but with other sauces and toppings. Basically I search for easy slow cooker recipes, find one that sounds ok and give it a go.
When I opened the lid the next day I should have realized something wasn’t right. Usually the chicken is super easy to shred, but this wasn’t. I didn’t think too much about why it wasn’t easy to shred, I just resigned myself to larger pieces of chicken, no biggy. I portioned out my lunch and went to meet my peeps.
Not too long after I finished eating I started to feel not well. My stomach was not happy. I wasn’t in danger of throwing up or anything, I just didn’t feel well. I shrugged it off and continued on with my day, which involved cleaning, and a long walk on some trails with a friend, then dinner. Through it all I wasn’t feeling awesome and none of the things I tried seemed to help.
Next day I was still feeling off but not as much which made me think I might be fighting off a bug and Wednesday was just an especially hard day for my immune system.
Well! Ha! I’m such a dummy! I should have checked the chicken. Soooo should have checked the chicken *rolls eyes*
I took some of the left overs out of the fridge Thursday to heat up and started cutting one of the chicken breasts in to smaller pieces so it would warm up faster and wow was the inside of that bird pink-red. It was a deep enough pink to notice through the gravy! I thought my lighting must be messing with me so I picked up the plate and moved it every which way and whadda know, the pink-almost-red colour didn’t go away. Shocking I know!
Still not trusting what I was seeing I pulled out another piece of cooked chicken, cut it, and saw red…well, more of a deep pink lol but you get my drift.
How did my chicken not cook? Not like I haven’t used the slow cooker function on my Instant Pot before. Could this be why lunch left me feeling sick? Is this chicken now ruined?
So many questions.
In a flash of insight I realized I made a stupid mistake. When using the slow cooker function on the Instant Pot I have always put the setting to “high” and cooked for 8 hours. This time I forgot to change the setting so it cooked for 8 hours, but only at “medium”, which apparently makes a big difference. Ya know, the difference between cooked chicken and deep pink chicken. The difference between chicken that shreds and chicken that doesn’t shred. The difference between chicken that gives you some lovely protein instead of a stomach ache and feeling of being sick.
It is four days away from compost pick-up day so I put the pink chicken back in the fridge so it doesn’t smell up the bin and will throw it out on the appropriate day. I don’t know if I put it in a pan and heat it up, and continue to heat until the pink is cooked away, if that will make it safe to eat, and frankly, it isn’t something I am willing to test. So my stupid mistake has cost me three chicken breasts, which is a pisser cause groceries ain’t cheap!
But there you have it, in the battle of chicken breasts vs human who sucks at cooking, the chicken won. Thank goodness for take-out! 😉
Granted, not the best pictures out there of quiche, but they could be worse, theoretically lol
I did some googling and found multiple recipes for single serving quiche, hey now, don’t judge, some of us are single and cooking for one.
They all seemed to be pretty much the same. Sure some had you making your own crust from scratch, while others had you not using any crust, and the fillings got swapped out, but the general base of it seemed pretty standard and lucky for me, easy to copy.
I didn’t feel like making my own crust and was going to make the crust-less version only but this is me, and why do one thing when you can do two?
The mix, batter, filling, I don’t know what to call it, the quiche part? That is made up of:
2 eggs and 2 Tablespoons of milk whisked together, oh and add whatever seasonings you want before whisking…I put in dill and pepper.
Add 2 to 4 Tablespoons of stuff, by stuff I mean any combo of veggie, meat, and cheese you so desire. I did a mixture of diced super tiny orange pepper, diced super tiny mushroom, light marble cheese, and minced garlic.
Once it is all mixed together either evenly distribute it between tart shells or pour in to a greased (I sprayed with Pam) oven safe dish (I used my mini Corningware), and pop it in the oven at 375C for 20 to 30 minutes. My oven took 20 minutes and it was not quite at 375C, more like the halfway point between 350C and 375C. I was worried about the temperature because according to the tart shell box they should be baked at a lower temp for a shorter amount of time and I had visions of burning them and once again setting off my smoke detector. *rolls eyes*
Oh, so just to clarify, one combo of the above mixture was used in my mini Corningware, and a separate batch filled the 5 tarts.
When the timer beeped and I took them all out of the oven I realized I had no idea how to tell if a quiche is done so I poked it with a cake tester and it came out clean. Then I realized how stupid that is so I googled lol Google, and a friend I happened to be texting with at the time, both said if it doesn’t jiggle then it is done so I gave them all a good shake, decided I didn’t see any jiggling and declared them perfect.
The quiche mixture in the tart shells was super poofy when I first took them out of the oven but they flattened quickly, the mixture in the dish might have poofed as well but the flattening maybe wasn’t as obvious because it is in a dish and it was never higher than the edges, that and I was so distracted by the tart shell versions I kinda ignored the one in the dish lol
In case you were wondering, it turns out I make pretty decent quiche. 😉 I ate one of the tart versions and the egg mixture was light, and fluffy, and quite good. I forgot to put the diced turkey in there, which I only clued in to once I was tasting one of them, oops! Guess that means I’ll hafta make them again and try a new combo of ingredients, such a hard life! 😉
I was trying to find a link to my mini Corningware in case anyone was wanting one for themselves, I find them incredibly useful when cooking…course that could be a single girl thing lol…but I can’t find them on Amazon so instead here is a link to a simple Corningware 7 ounce ramekin which I think would also be pretty good for making a quiche in. If you click on the picture it should take you to the Amazon page where you can read the deets about them.
Sooooo, I sorta made a brownie-in-a-mug this evening when I thought I was going to be making hot chocolate.
Oops?
Although, are brownies ever reeeally an accident? 😉
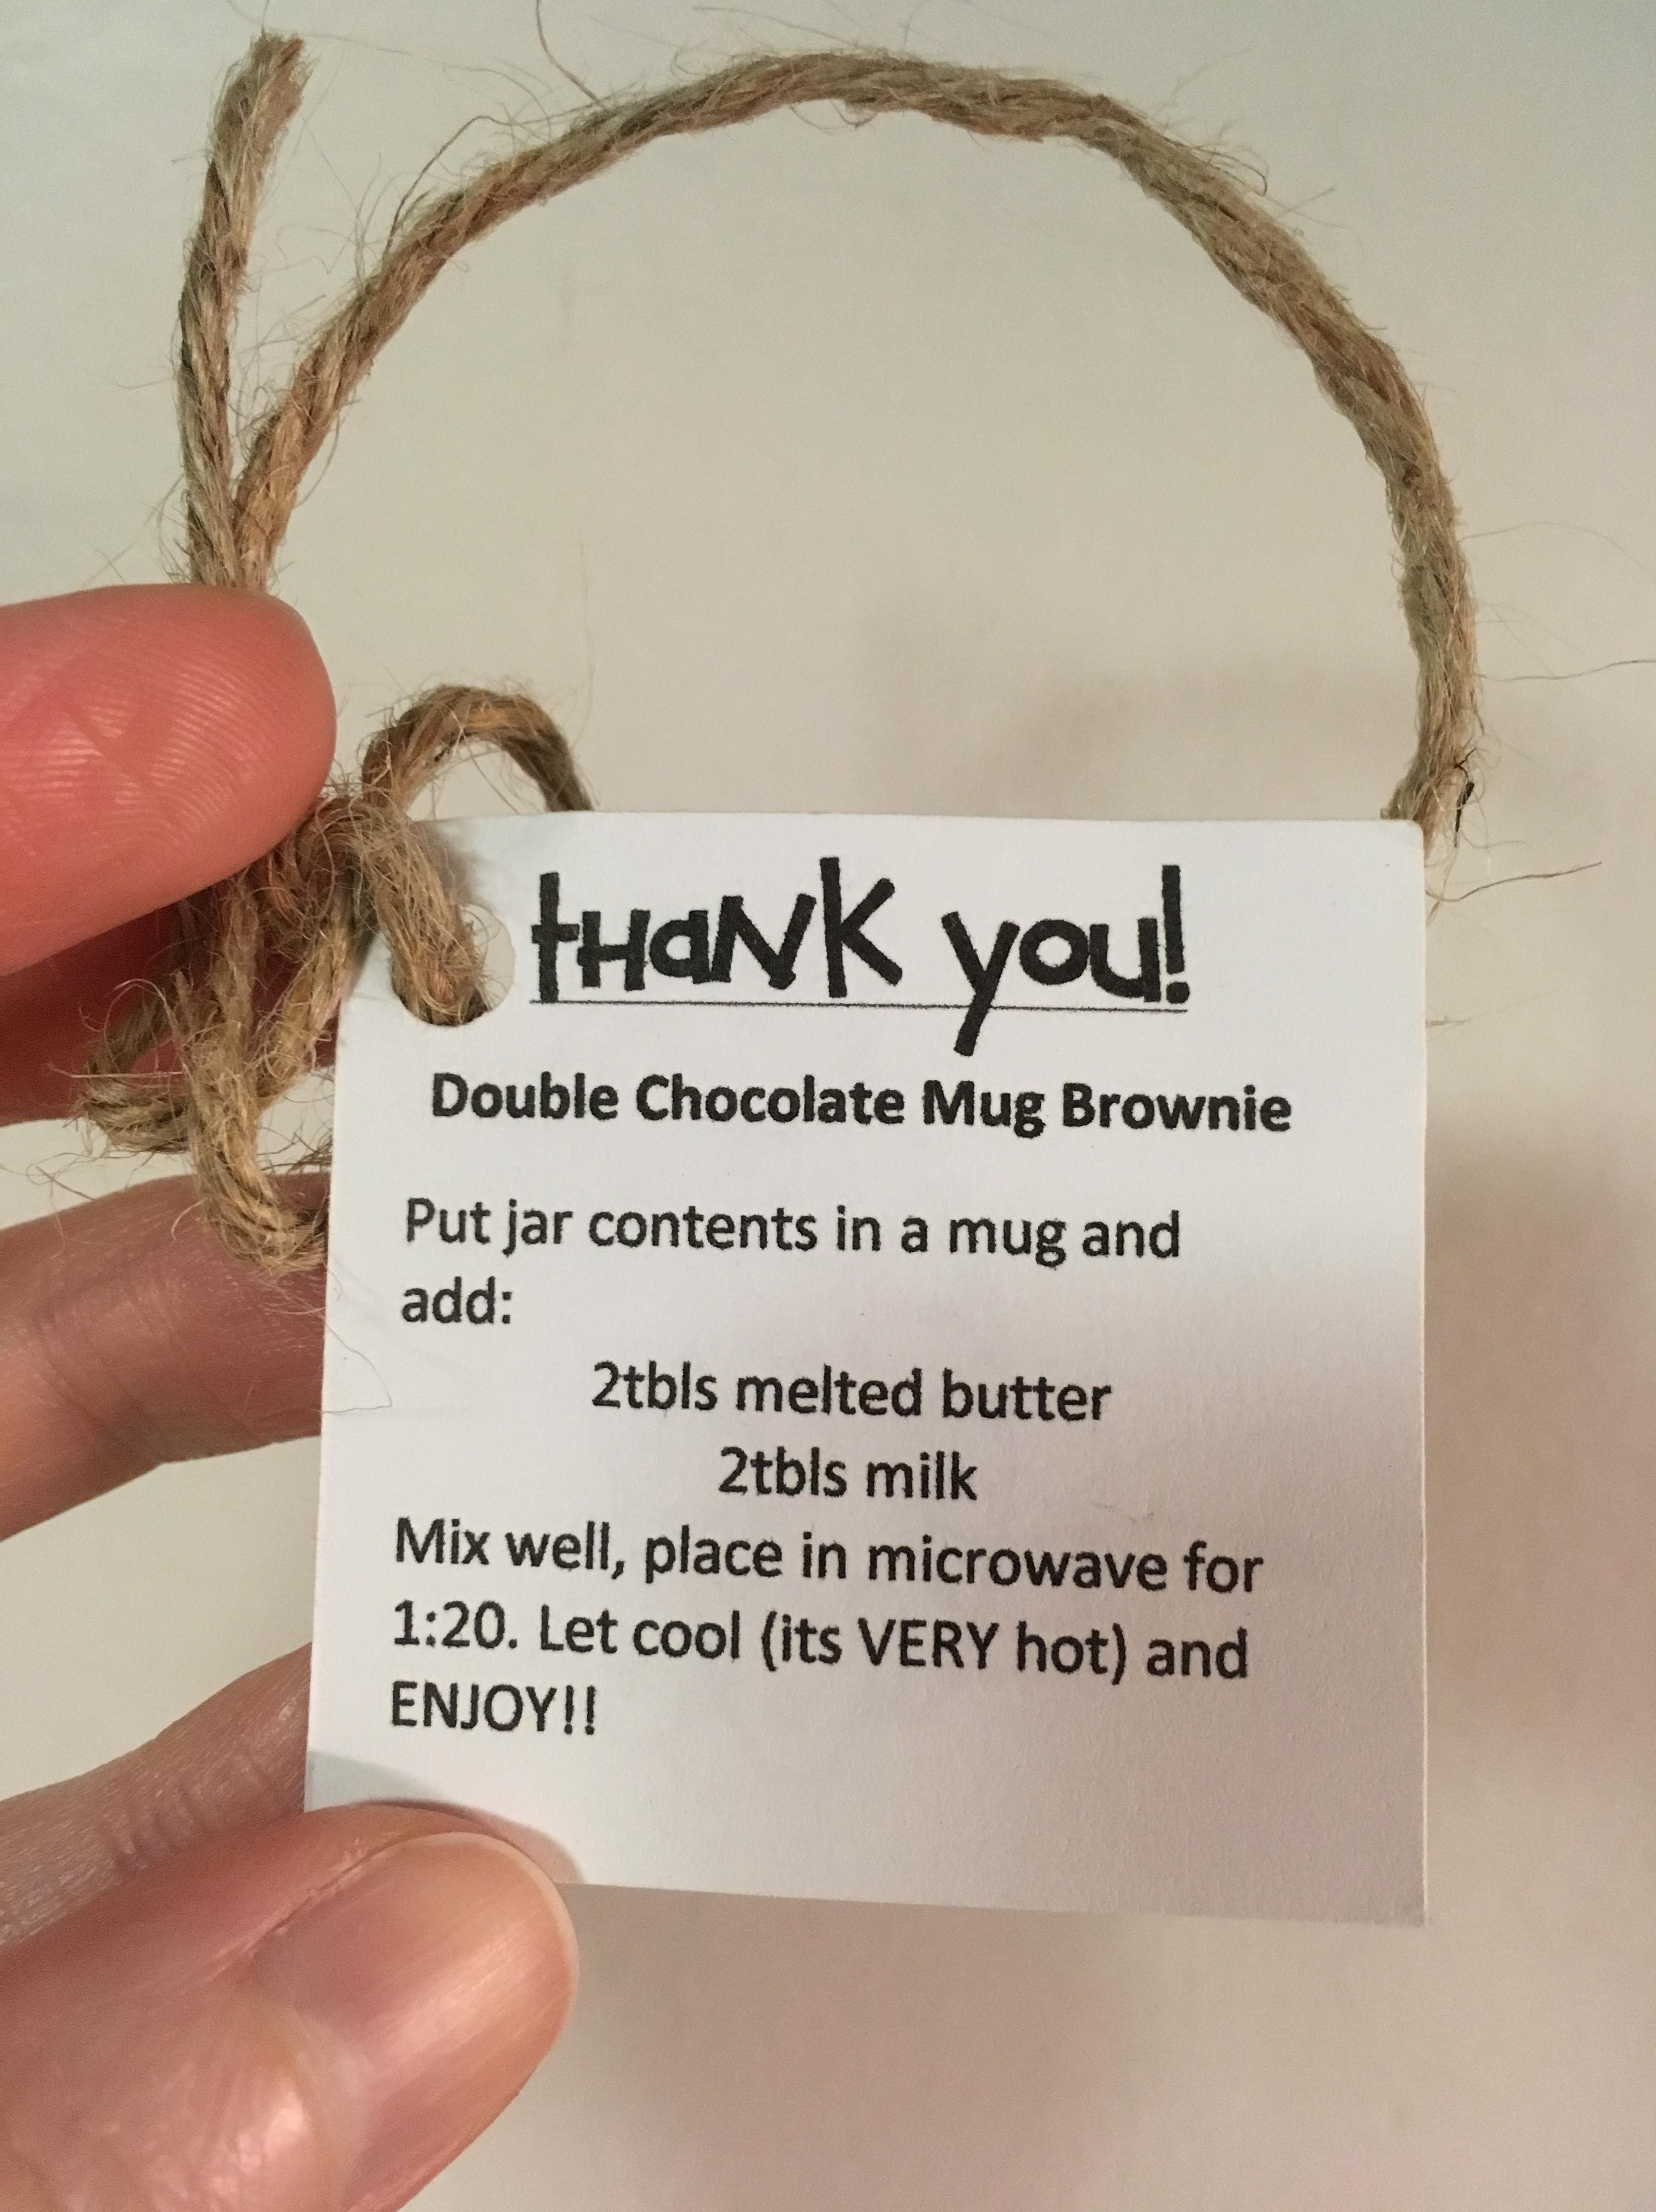
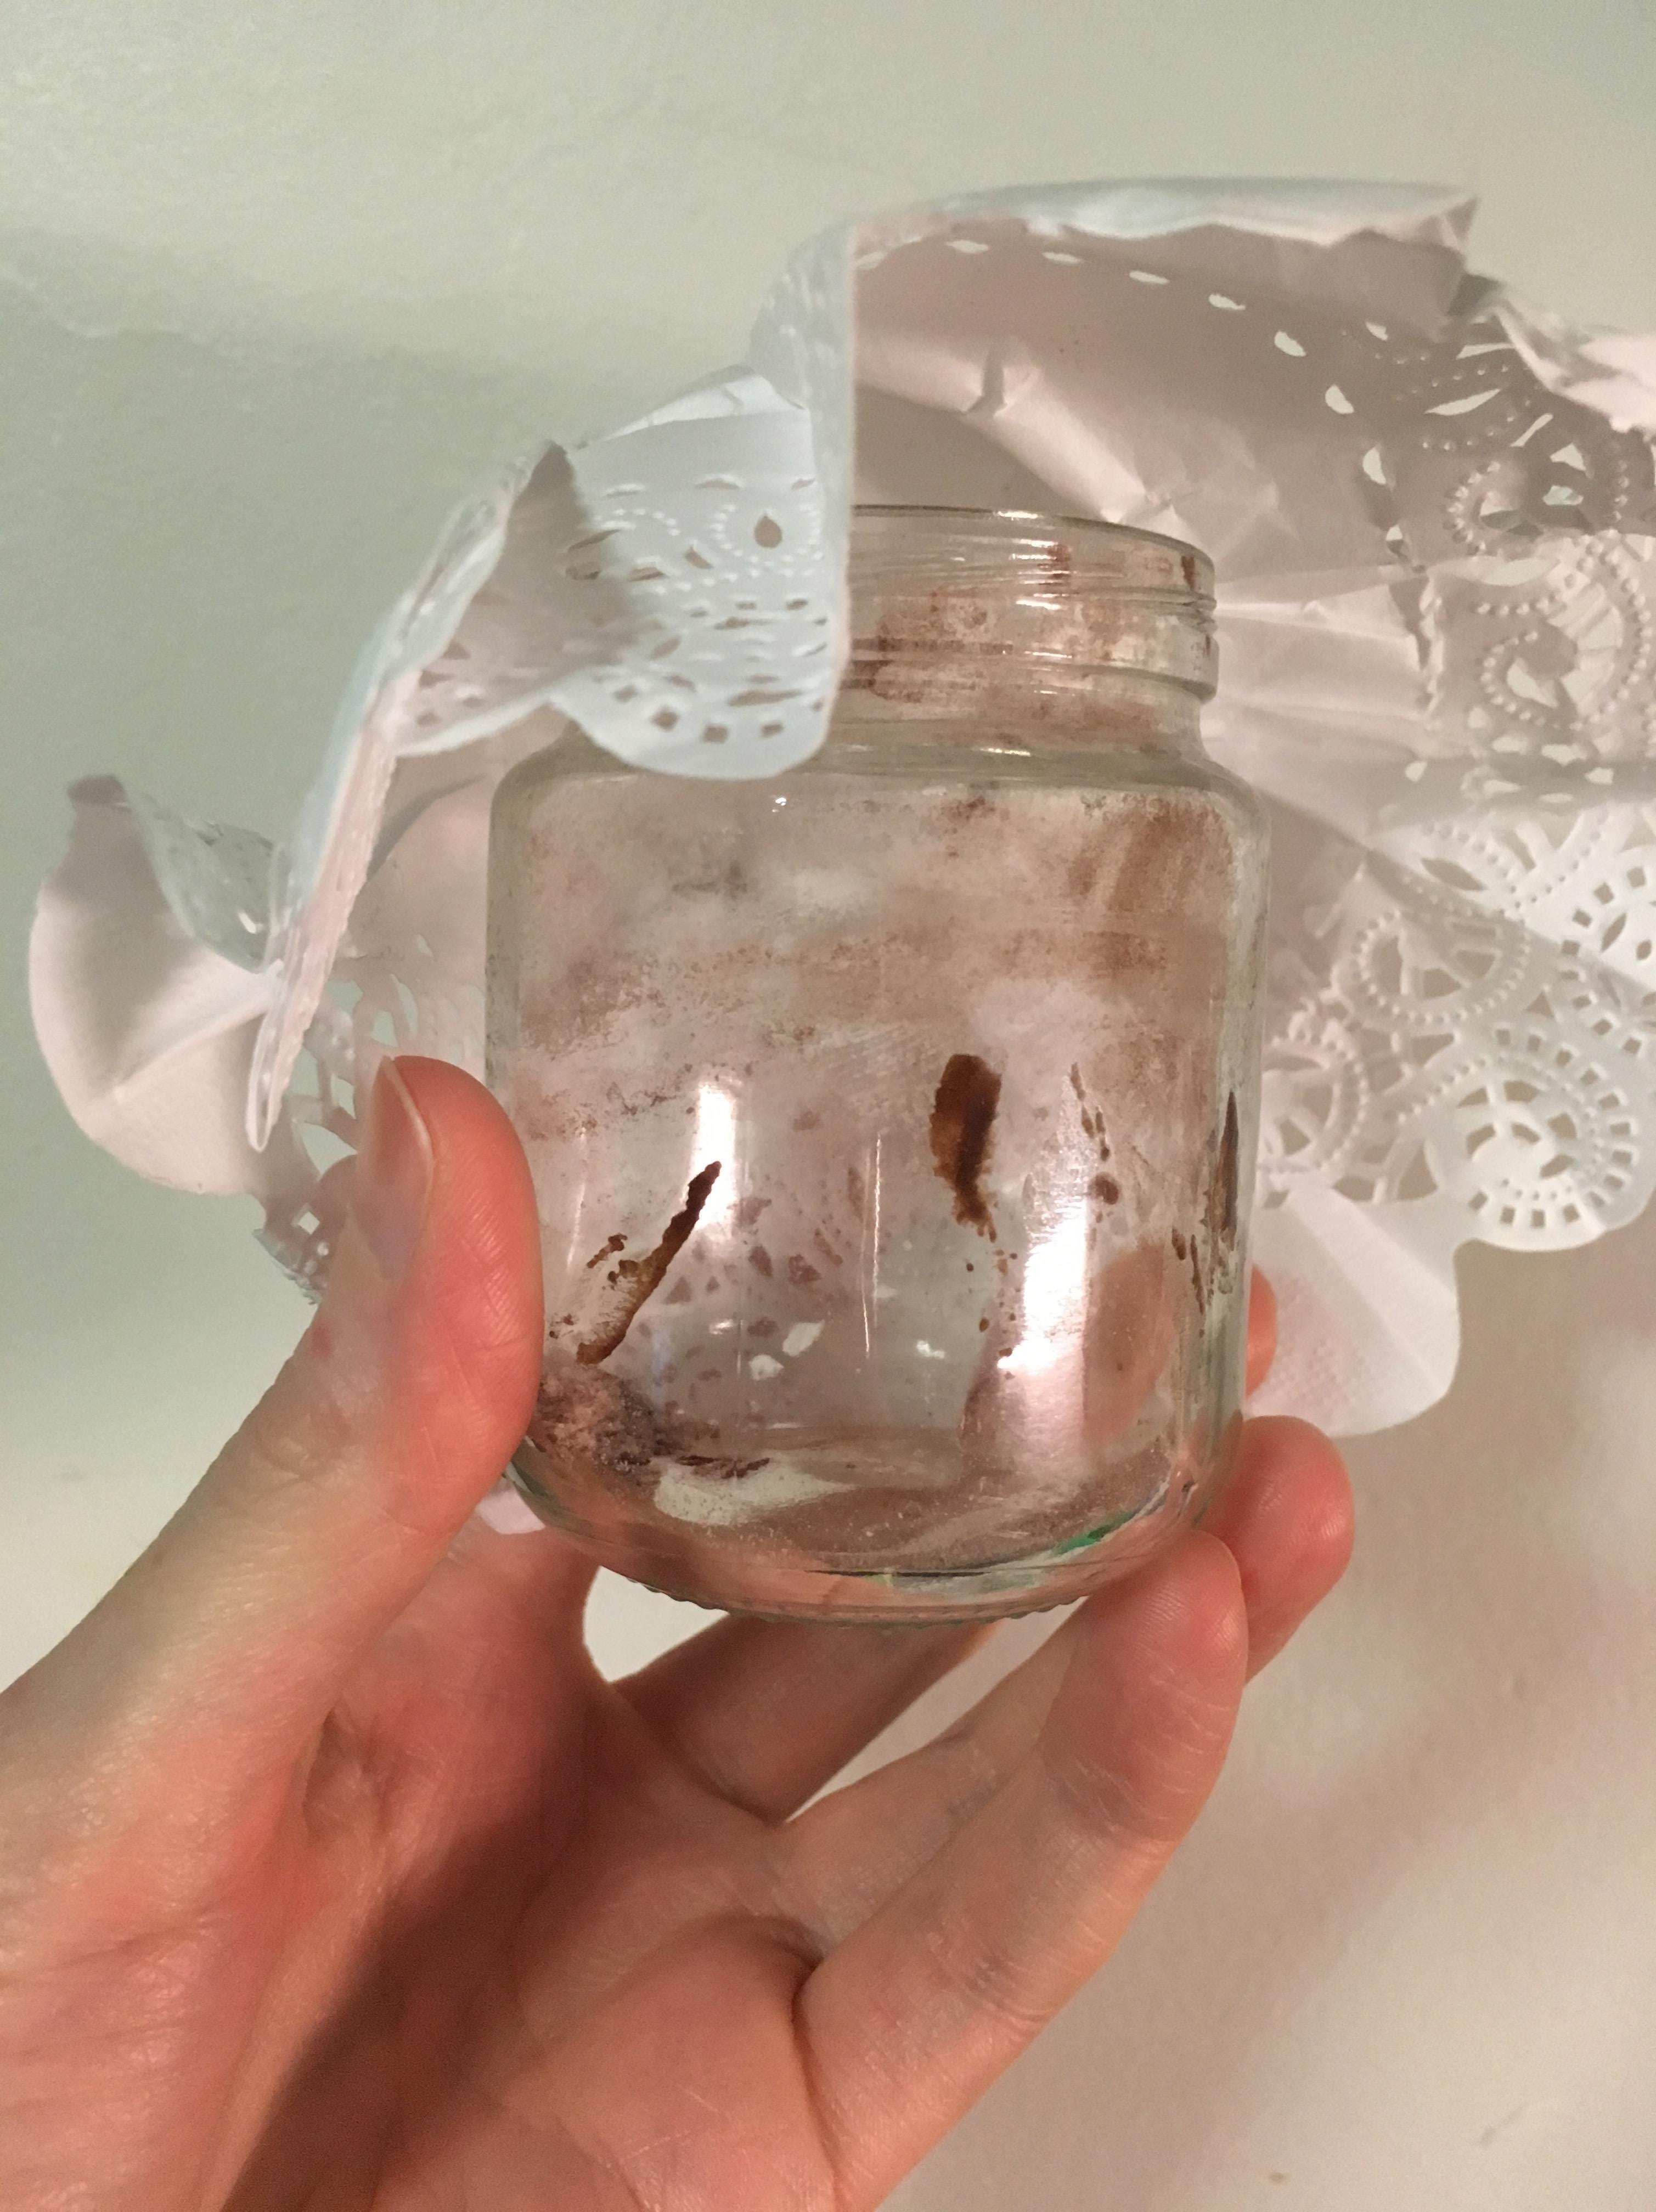
My mom received a cute little jar with dry ingredients layered in it and instructions as to how to turn the contents in to a brownie-in-a-mug. She oh so sweetly gave it to me…mostly she gave it to me because she has stronger will power while I tend to go off the rails a tad more often, so really, I think it was to get temptation out of her pantry and put it in mine lol
For some reason when I read the tag I thought it said it was to make hot chocolate, which confused me because the instructions say to add melted butter, and why would I put melted butter in to hot chocolate? So instead of, oh I dunno, re-reading what it was, I just assumed it was some sort of fancy hot chocolate deal and tucked it aside for when I wanted fancy hot chocolate.
Today was the perfect day for hot chocolate! It was snowy, and chilly but not cold, a great day for being cozy inside with a cup of hot chocolate and a book. 🙂
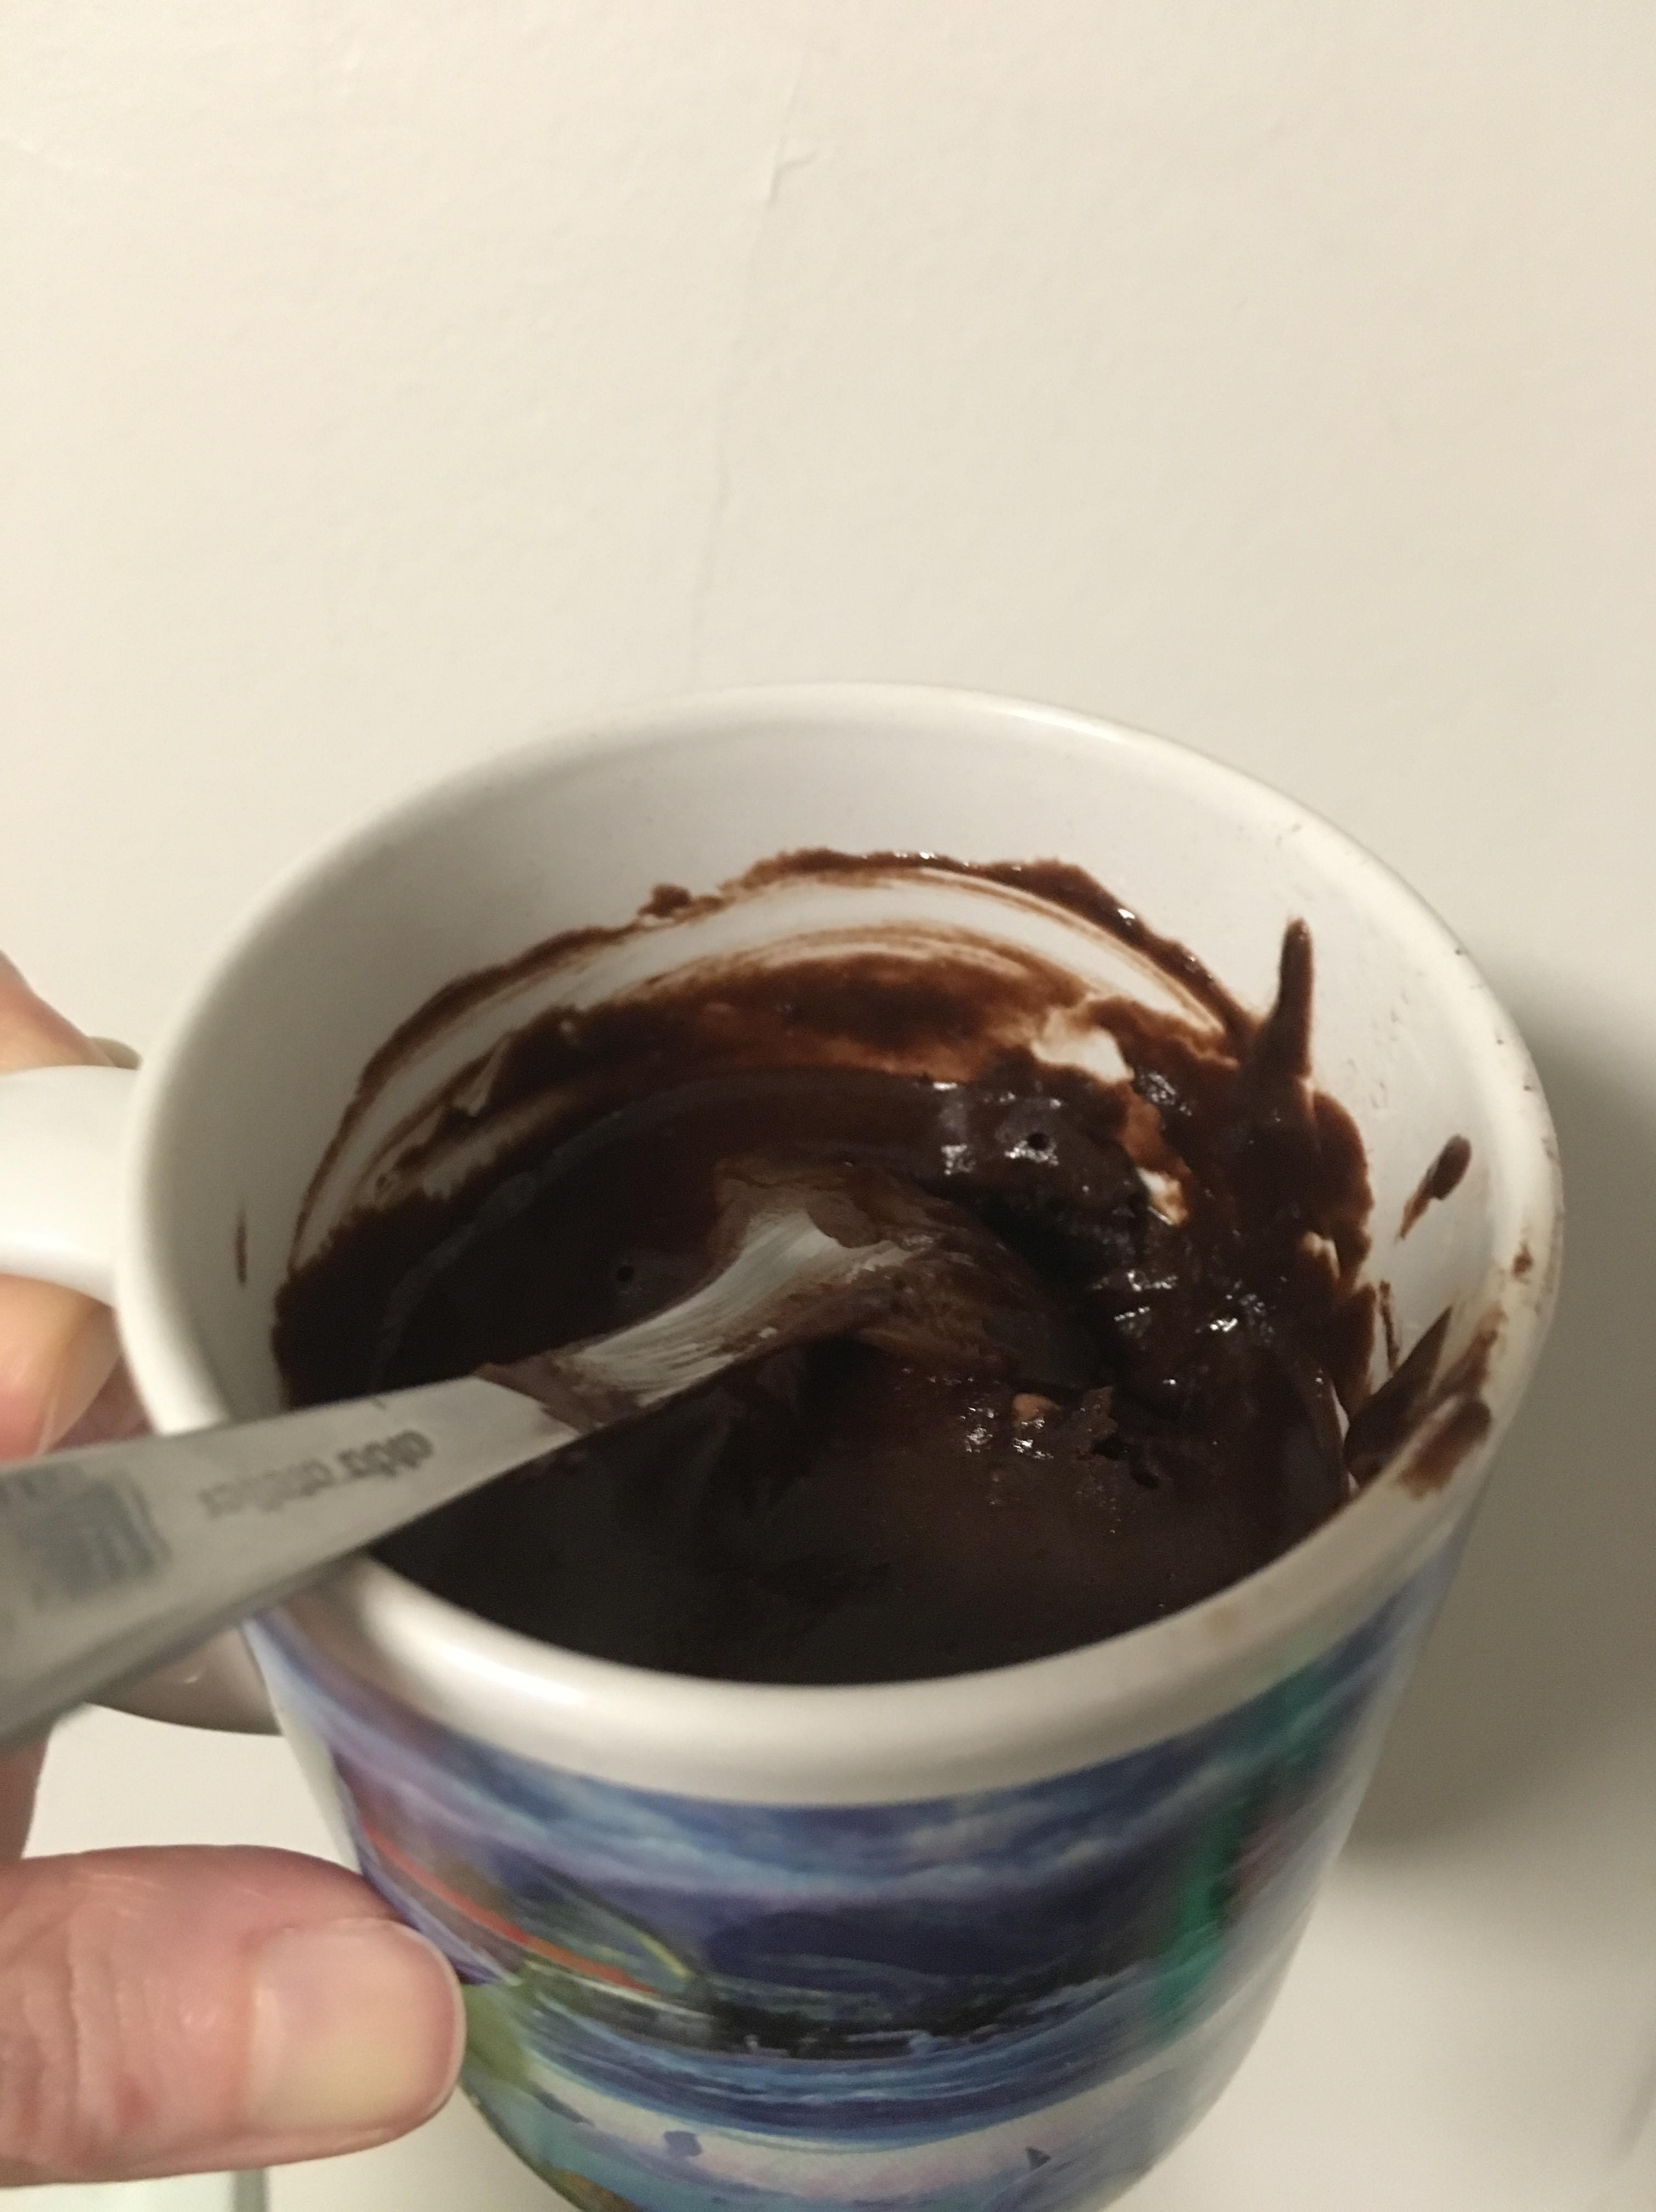
Again, without re-reading the name of what I was making I poured the dry ingredients in to a mug, added the milk and melted butter, popped the whole thing in the microwave and eagerly awaited my hot chocolate.
Now, the instructions say to let it cool because it will be very hot but you can’t let hot chocolate cool too much or it becomes not as yummy, plus I have noooo patience lol. So it was out of the microwave maybe 30 seconds and I took a spoon to it – I’m that weirdo that likes to drink my hot chocolate by the spoonful instead of sipping from the side of the cup.
I dipped my spoon in and came up with some mighty thick hot chocolate *rolls eyes at self* Not to be deterred, and hello, it is chocolate so no matter what it is going to be good, I tried it and oh man was it good!
Definitely not hot chocolate though! 😛
It turned in to a fudgey, gooey, chocolate brownie….that just so happened to be in a mug.
There were milk and dark chocolate chips in it, which did not melt, but they were soft so when you got one on the spoon that bite had a little extra Mmm! to it. The bottom part of the brownie was a bit more dry than the top part, but still delish.
I did go take a second look at the instructions that came with the jar and only then noticed that is clearly says “Double Chocolate Mug Brownie”…hey, I never claimed to be super observant…
How I thought “hot chocolate” after seeing this I do not know.
The little jar it came in. The doily was on top of the lid to make it cuter.
Trust me, it tastes better than it looks!
The back of the tag – who doesn’t go “awww” when seeing those two hug?
So yeah, not quite the treat I was expecting, but lovely all the same. Now if only I could figure out exactly what was in the dry ingredients and the quantities so I could make it again! I can figure out the basics, but I’ve had cake-in-a-mug before and it was never as good as this one so something is different here…just not sure what.
Looks like I’ll be forced to taste test experiments until I figure it out – oh what a hard life! 😉
Time for another recipe! Well…it was sort-of a recipe, more like recommendations of ingredients with vague comments about how to put them together lol
I wanted to try making Chicken Pot Pie, the kind with the biscuits on top, but had no idea how. So I did what I always do, I YouTubed and Googled and came up with lots of recipes but also lots of questions.
All the recipes mentioned needing whatever quantity of cooked chicken, but none of them said how to cook the chicken. Am I supposed to bake it? Grill it? Boil it? Why don’t these recipes start with “Step 1: cook the chicken in such-n-such a manner”? Won’t the chicken cook when it is in the oven mixed with all the other ingredients?
That was my main line of confusion, so then I did what I always do when confused by recipes, I emailed my mom. I basically sent her the questions I typed in the above paragraph with a desperate plea for help.
She took pity on me, probably while shaking her head wondering how I function as an adult when left to my own devices, and replied with the tidbit of information that chicken pot pie is designed to use up left over chicken, which is why the recipes don’t say how to cook the chicken.
Oops!
Then she sent a recipe for chicken pot pie she has from a relative…
1 can mushroom or celery soup (Aunt Jude used one of each as she was making a 9 x 13 pan)
Cooked chicken, cubed
chopped onion, celery, mushrooms
frozen mixed vegetables, or left over veggies
seasonings
milk
Mix soup and small amount of milk in a large bowl. Stir in cooked chicken and chopped onion, celery and mushrooms, add frozen veggies (or a mix of frozen/left over veg) till you like the quantity. Pour into casserole dish, top with pastry lid. Bake at 375 for 25 mins, or until pastry looks cooked.
This is not a recipe!
This has vague measurements, and even vaguer details. A small amount of milk? What is a “small amount”? When I asked her she said “until it looks right”. *rolls eyes*
And uh, hello, “seasonings”…what seasonings? Which ones? How much of each?
Some of us need a detailed road map when cooking and the above recipe was not that!
Not wanting to admit defeat I attempted to make the recipe, only smaller as I didn’t want endless left overs. I used one can of the mushroom soup, 1/4 of a can of milk, half a bag of mixed frozen veggies (Compliments brand, they are meant for soup so lots of celery, carrots, things like that), a bunch of shredded chicken that I bought from Safeway, and for seasonings I used parsley, oregano, basil, and jalapeno red pepper flakes…what can I say, I wanted a bit of a kick to the flavour.
The kick didn’t really happen, it is a bit bland but not in a bad way, which sounds weird I know. It actually ended up tasting fairly good, it isn’t pretty but oh well. It also isn’t some strongly flavoured dish but I don’t think it is supposed to be and maybe it wouldn’t taste like chicken pot pie if it was…deep thoughts to ponder on some other day lol
I didn’t make the biscuits, or give it a pastry top. I was going to make an individual biscuit using the two ingredient dough that has exploded in popularity all over the internet but was too lazy and didn’t lol I didn’t want to make the biscuits or pastry lid like on traditional pot pies because I thought they would get soggy after being on there for a while and since it is only me eating this thing I was betting on the leftovers lasting for days, and days, and then being frozen to last a little bit longer…and none of that made me feel confident in the biscuit life span. Go figure, I’m a bit of a cynic 😉
It turns out that the recipe that isn’t a recipe made a pretty good meal, that has fed me for daaaaays. Tomorrow will be my last serving of it and I’m gonna kinda miss it. I just might have to add this one in to my rotation of meals I make on a more regular basis…not that I actually have a list like that, but grown-ups seem to so maybe I should make a list…can putting “ordering pizza”on the top of a list like that count? Hmm…more deep thoughts to ponder… 😉
Cooking! Once again with the cooking. sigh. When will I be rich enough I can pay someone to do this for me? 😉
I bought an Instant Pot in November, it took ages to get to me thanks to WalMart’s slow delivery, but that’s fine because though I wanted it, and had vague but great plans for it, I had no idea what I wanted to cook in it.
It finally got opened a week ago and there were so many warnings in the box, in the book that came with it, on the actual device, that I almost boxed it back up out of fear that I would kill myself if I tried to use it. If anyone could do it…
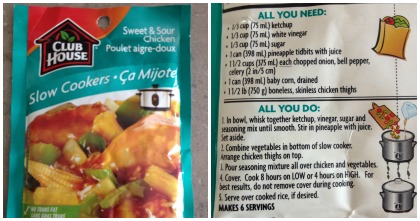
Instead I washed it, put it in the cupboard, and tried to figure out what to cook in it first. After much scouring of the internet for recipes I decided on Sweet and Sour Chicken. See, while the Instant Pot can be used in a whooooole bunch of ways, I mostly wanted it for it’s slow cooker settings. I owned a tiny slow cooker, because I am single and don’t need a massive slow cooker, but the tiny slow cookers are lame in that they aren’t programmable, so you have to be around to turn it off when you want it to stop cooking which means I could never set it and go to work, or practice, or wherever, because I wouldn’t be home in time to turn it off and the food would over cook.
This adorable 3 quart Instant Pot however, has all the bells and whistles, while being a small enough size for my needs. Yay!
Because I was still half convinced I was going to either (1) make it explode or (2) experience recipe failure, I picked an easy recipe to try.
I bought one of those Club House slow cooker packages and for the most part did what it said to do.
I kind of guessed how many peppers would make the measurement required, same with the onion, aaaand the celery lol I ended up using three peppers (one red, one yellow, one orange – cause I liked the colours), one red onion, three or four celery stalks (can’t quite remember), one can of corn kernels (drained), and one can of pineapple tidbits (not drained). Oh, and instead of chicken thighs I used chicken breasts, I believe I put four or five in there, but that is because they were tiny.
Except for the guessing on measurements for the vegetables I did everything else exactly as described on the back of the seasoning package. After much googling I learned that “low” on a slow cooker equals “normal” on an Instant Pot, so I set it for 8 hours on normal, oh so slowly backed away, quickly begged the universe to let this work, and went to bed.
Whoever decides to try a new recipe, in a new kitchen appliance, for the first time, when it is a meal you are taking to share with friends, is either very sure of their cooking abilities or an idiot. I’m pretty sure you can figure out which of those applies to me lol
When I checked it in the morning it was perfect! The chicken was tender, moist, perfectly cooked, the veggies were cooked but still a bit firm (which is how I like them), and the sauce was delish. I took the chicken out, cubed it, put it back in and mixed it all around, then left it on the “warming” setting until I was ready to put it in a container and take it to the get together I had made it for.
People loved it! It also made a huge amount, so I am grateful I took extra and sent people home with left overs, there is after all, only so much sweet and sour chicken a girl can eat in one week lol
I’m glad I started with such a simple meal, makes me think maybe the next dish I make in there will work out also!…maybe…
Does it still get to be called meatloaf if it isn’t, say, quite a loaf shape? Or any shape…
Deep thoughts to be pondered over here tonight.
When I was home at Christmas I took a pic of my mom’s recipe for meatloaf. I don’t know why meatloaf gets such a bad rap, my mom’s is really good. She was kind enough to make it when I was home and when her back was turned I took a pic of the recipe and smugly thought I could recreate it for myself anytime I wanted.
I really should know better by now. *rolls eyes*
The only thing I swapped in the recipe was Panko instead of bread crumbs, though it turns out mom actually uses wheat germ (not sure what that is, so I know it isn’t in my cupboard!). Other than that I did everything the recipe card said.
My cooking ability being what it is the meatloaf turned in to a red in the middle, setting off my smoke detector twice, mess. Oops?
Before the hour of cooking was up I heard sizzling sounds, the liquid from the meatloaf was spitzing over the edge of the loaf pan and sizzling. I started to freak out, what if it caught on fire or something? So I put a cookie sheet underneath the loaf pan to catch any flying liquid and then nervously sat staring at the oven for the remaining 15 minutes wondering if the cat and I were far enough away to not be harmed if it blew up. When the timer went off I took the loaf pan out oh so carefully (so as not to spill all that liquid that magically appeared…seriously, what is that? I used extra lean ground beef!), poured out the liquid, hastily put everything down so I could wave my oven mitt under the smoke detector to shut it off…fyi, there was no smoke so I don’t know why it went off. Then I cut in to the middle of the loaf, took a peek and swore because oh man so much red still left in there.
Obviously my oven’s 350 degrees is not the same as my mother’s oven’s 350 degrees.
I put it back in for another 20 minutes, nervously hovering and peeking through the window in the oven door…cause ya know, that’ll make everything work out better lol. When the 20 minutes was up I pulled the loaf pan out, poured out more liquid, waved the oven mitt under the smoke detector again, swore a bit louder this time, cut in to a different part of the meatloaf, discovered pink (which is a downgrade from red, so better I guess…), and put the whole thing back in the oven. sigh.
When I next pulled it out I had gotten smarter and put the oven fan on high so yay for no more smoke detector going off! I cut the meat loaf in a new spot, by this point the poor thing was in pieces, and thought it looked cooked through. Finally!
Totally got ahead of myself though. When I put the spatula in and pulled up a piece the bottom half stayed in the pan. Ok, fine, so that first piece won’t be pretty, that’s all good. Um, yeah, all of the lower half of the loaf stayed in the pan because while the top half became meatloaf-esque the bottom half did not. It was more uh, ground beef with some stuff mixed in it that I wasn’t sure was totally cooked.
I was fed up by this point so the upper half of the loaf got pulled out and put on a plate, the lower half that did not choose to take form got put in to a frying pan where I cooked it a bit longer, juuuuuust in case…hey now, no judging, nobody over here is wanting food poisoning thanks.
So this is what I ended up with…
There was more of the meatloaf that was sort-of loaf shaped, it just didn’t make it in to the picture because I’d already admitted defeat and put it in a tupperware container. I have been told the ground meat on the left would be good in a chili, I was thinking of using it as my breakfast protein for the next couple days and tossing some in with some scrambled eggs, or making a wrap or something…
The meatloaf that is sort-of loaf shaped is slowly being eaten. I ate some as-is and it was good. I also made a cold meatloaf sandwich and it was good then also. So, the flavour is right, the meat is cooked, it just didn’t take shape the way it would have for my mother.
I’m thinking maybe I had too much in the pan. It was quite domed above the edge of the loaf pan, but I thought it would be ok because my mom warned me it would shrink down, so I thought maybe it was supposed to start high…I’m now realizing that logic may be flawed and perhaps I should have either (1) used less meat (in my defence I used the amount specified in the recipe) or (2) split the mixture into 2 loaf pans.
It would be nice if these simple, logical thoughts, came to me while I am cooking, instead of the day after. 😉
The other night a friend came over to help me move furniture. She was originally going to help me move but since I don’t have to move anymore (long story!) I decided to use her muscles to help me rearrange my living room.
In the way of friends, and moving, and all that, I offered to pay her for her help…in food. I figure you offer pizza and drinks when bribing friends to help you move, the least I could do was offer her dinner and dessert to help me rearrange furniture.
The rearranging was actually a lot easier than anticipated, which was a lovely surprise.
And the food turned out pretty decent, yay!
I got a recipe from a lady I follow on YouTube, it is called One Pot Enchillada Pasta. She got the recipe from someone she follows online (oh the wonders of the internet). The link to the video is here:
Cause ya know, it is important to give the right people credit.
I won’t go in to the details of how to make the dish since I have just provided you with two links to that info, but here is a brief overview of my cooking adventure with this recipe.
The hardest part was finding enchilada sauce. Yup, you heard that right, that sauce was an elusive beast. I just sorta assumed it would be in the Old El Paso aisle at any grocery store so I stopped at Superstore on my way home from work to grab that and a bunch of the other ingredients, only to discover they don’t carry enchilada sauce, in any aisle, by any brand. Uhh, it is sorta one of the main most needed ingredients considering “enchilada” is in the title of the recipe! I had a sneaky suspicion that if Superstore didn’t carry it other stores might not so I then proceeded to call a bunch of other grocery stores (figured calling saved me more time than driving all over the place) and it turns out nobody had the sauce.
Just greeeeeat.
There goes that cooking plan. *rolls eyes*
Later that night at home I googled the sauce and discovered that Save-On-Foods carries it and they have the whole order online and pick-up the order whenever it is convenient for me deal so that is exactly what I did. I placed the order, timed my pick-up for after work the next day, problem solved!
The actual meal is easy to make, mostly because it is dumping a bunch of stuff in a pot lol Just brown the meat (ground beef or turkey, whatever you prefer), add the other stuff, stir, cook for a while, add a couple last minute things, stir, cover and simmer for a while, add some cheese and cover until the cheese has melted, serve.
Easy peasy.
I opted to not put the cheese on top and let it melt, mostly because the recipe called for a lot of cheese and sour cream and pasta, and is just in general a not-healthy recipe and I thought the least I could do was have us add our own cheese to our own bowls so we can decide how smothered our food was. It probably didn’t make much of a difference calorie wise at that point but hey, a girl can try!
Oh, and you can top your serving with a whole variety of things, tomatoes, avocado, green onions, sour cream, really, whatever you want. So I prepped some stuff for use as toppings and had it ready to go.
My bowl ended up looking like this…
Yes, I know my ratio of sour cream to everything else is out of whack but whatever, I like sour cream and very rarely eat it, shrug. You can’t really see the actual dish I made, only the toppings, but it is under there!
It turned out tasty. Spicy, thanks to the green chilies and possibly the enchilada sauce (I’m not sure just how spicy that sauce is since I didn’t taste test it separately before adding it to the pot), but not so spicy it is hard to eat. I used regular penne pasta for mine, and I added in one cup vs the 2 cups of ziti noodles the original recipe called for. I gotta say, one cup of penne was plenty! I don’t see why you’d need more than that. I think other than the change in cheese and the change of noodles I stuck to the recipe.
I’m happy with how it turned out, it made a huge amount of food, I had left overs for daaaaays! Despite that, I probably won’t make it again, unless I am making it to take somewhere, because it is so unhealthy, but as a one off it was enjoyable.
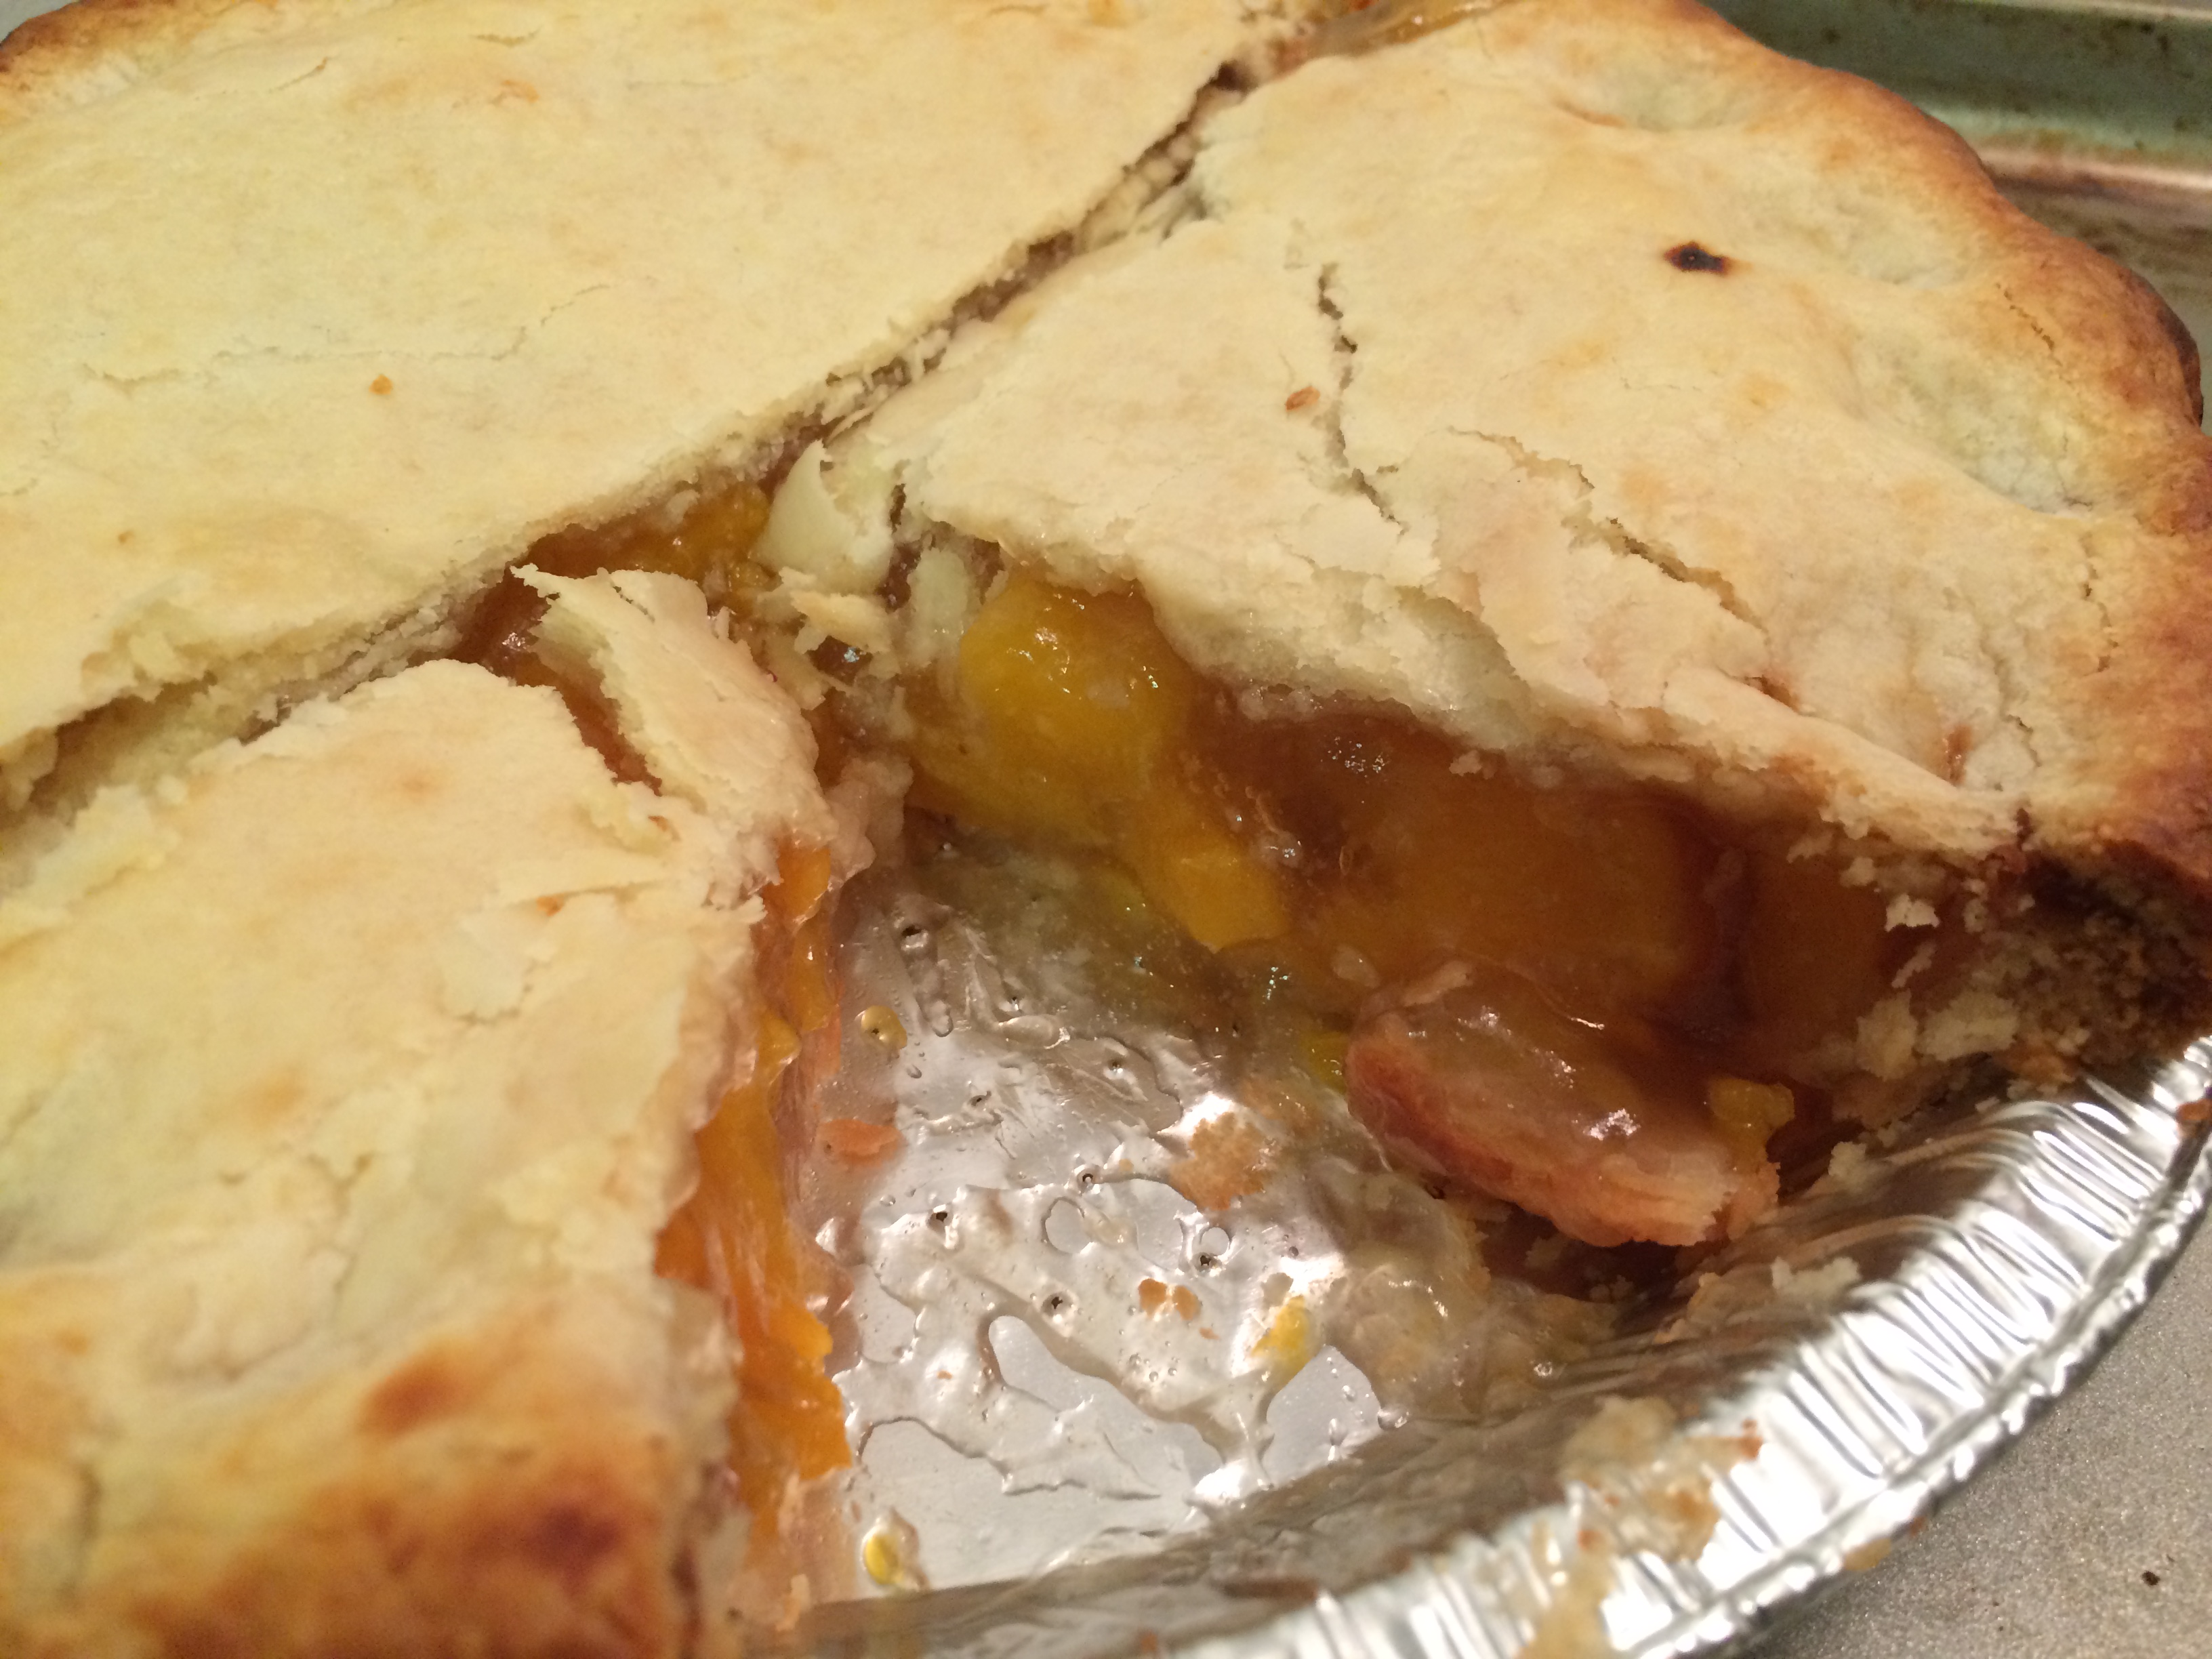
Dessert was also served that night, in the form of a frozen pie I actually bought from the friend that was helping me. She was fundraising and selling frozen baked items and one of the things I bought from her was a peach pie. I never got around to baking it and her coming over seemed the perfect excuse.
All I had to do was pop it in the oven for an hour, it then said to let it cool for two hours, which we felt was extreme so we cut in to it sooner than that lol Whoever said patience was a virtue wasn’t waiting for a pie to cool!
The crust was nice and flaky, the peaches were delish, the glaze or sauce or whatever you want to call it that the peaches were in was interesting. Not bad, just not what I was expecting. I think they added the juice or flavouring of another fruit in there, which is odd, is it not? Maybe that’s just me…
I was able to send left overs home with my friend and take a good chunk of the pie over to a different friend’s place a day or so later, the pie sure did make the rounds lol
All in all, it was a good pie, I could have made better (yes, I know that sounds smug but don’t hate a baker, that’s not nice 😉 ) but it was nice to have the convenience of just popping a ready made pie in to the oven and not have to do all the work of actually making it. Which I guess is why ready made foods are such a massive industry lol
So yeah, there we have it, two yummy dishes, made and enjoyed by all. 🙂
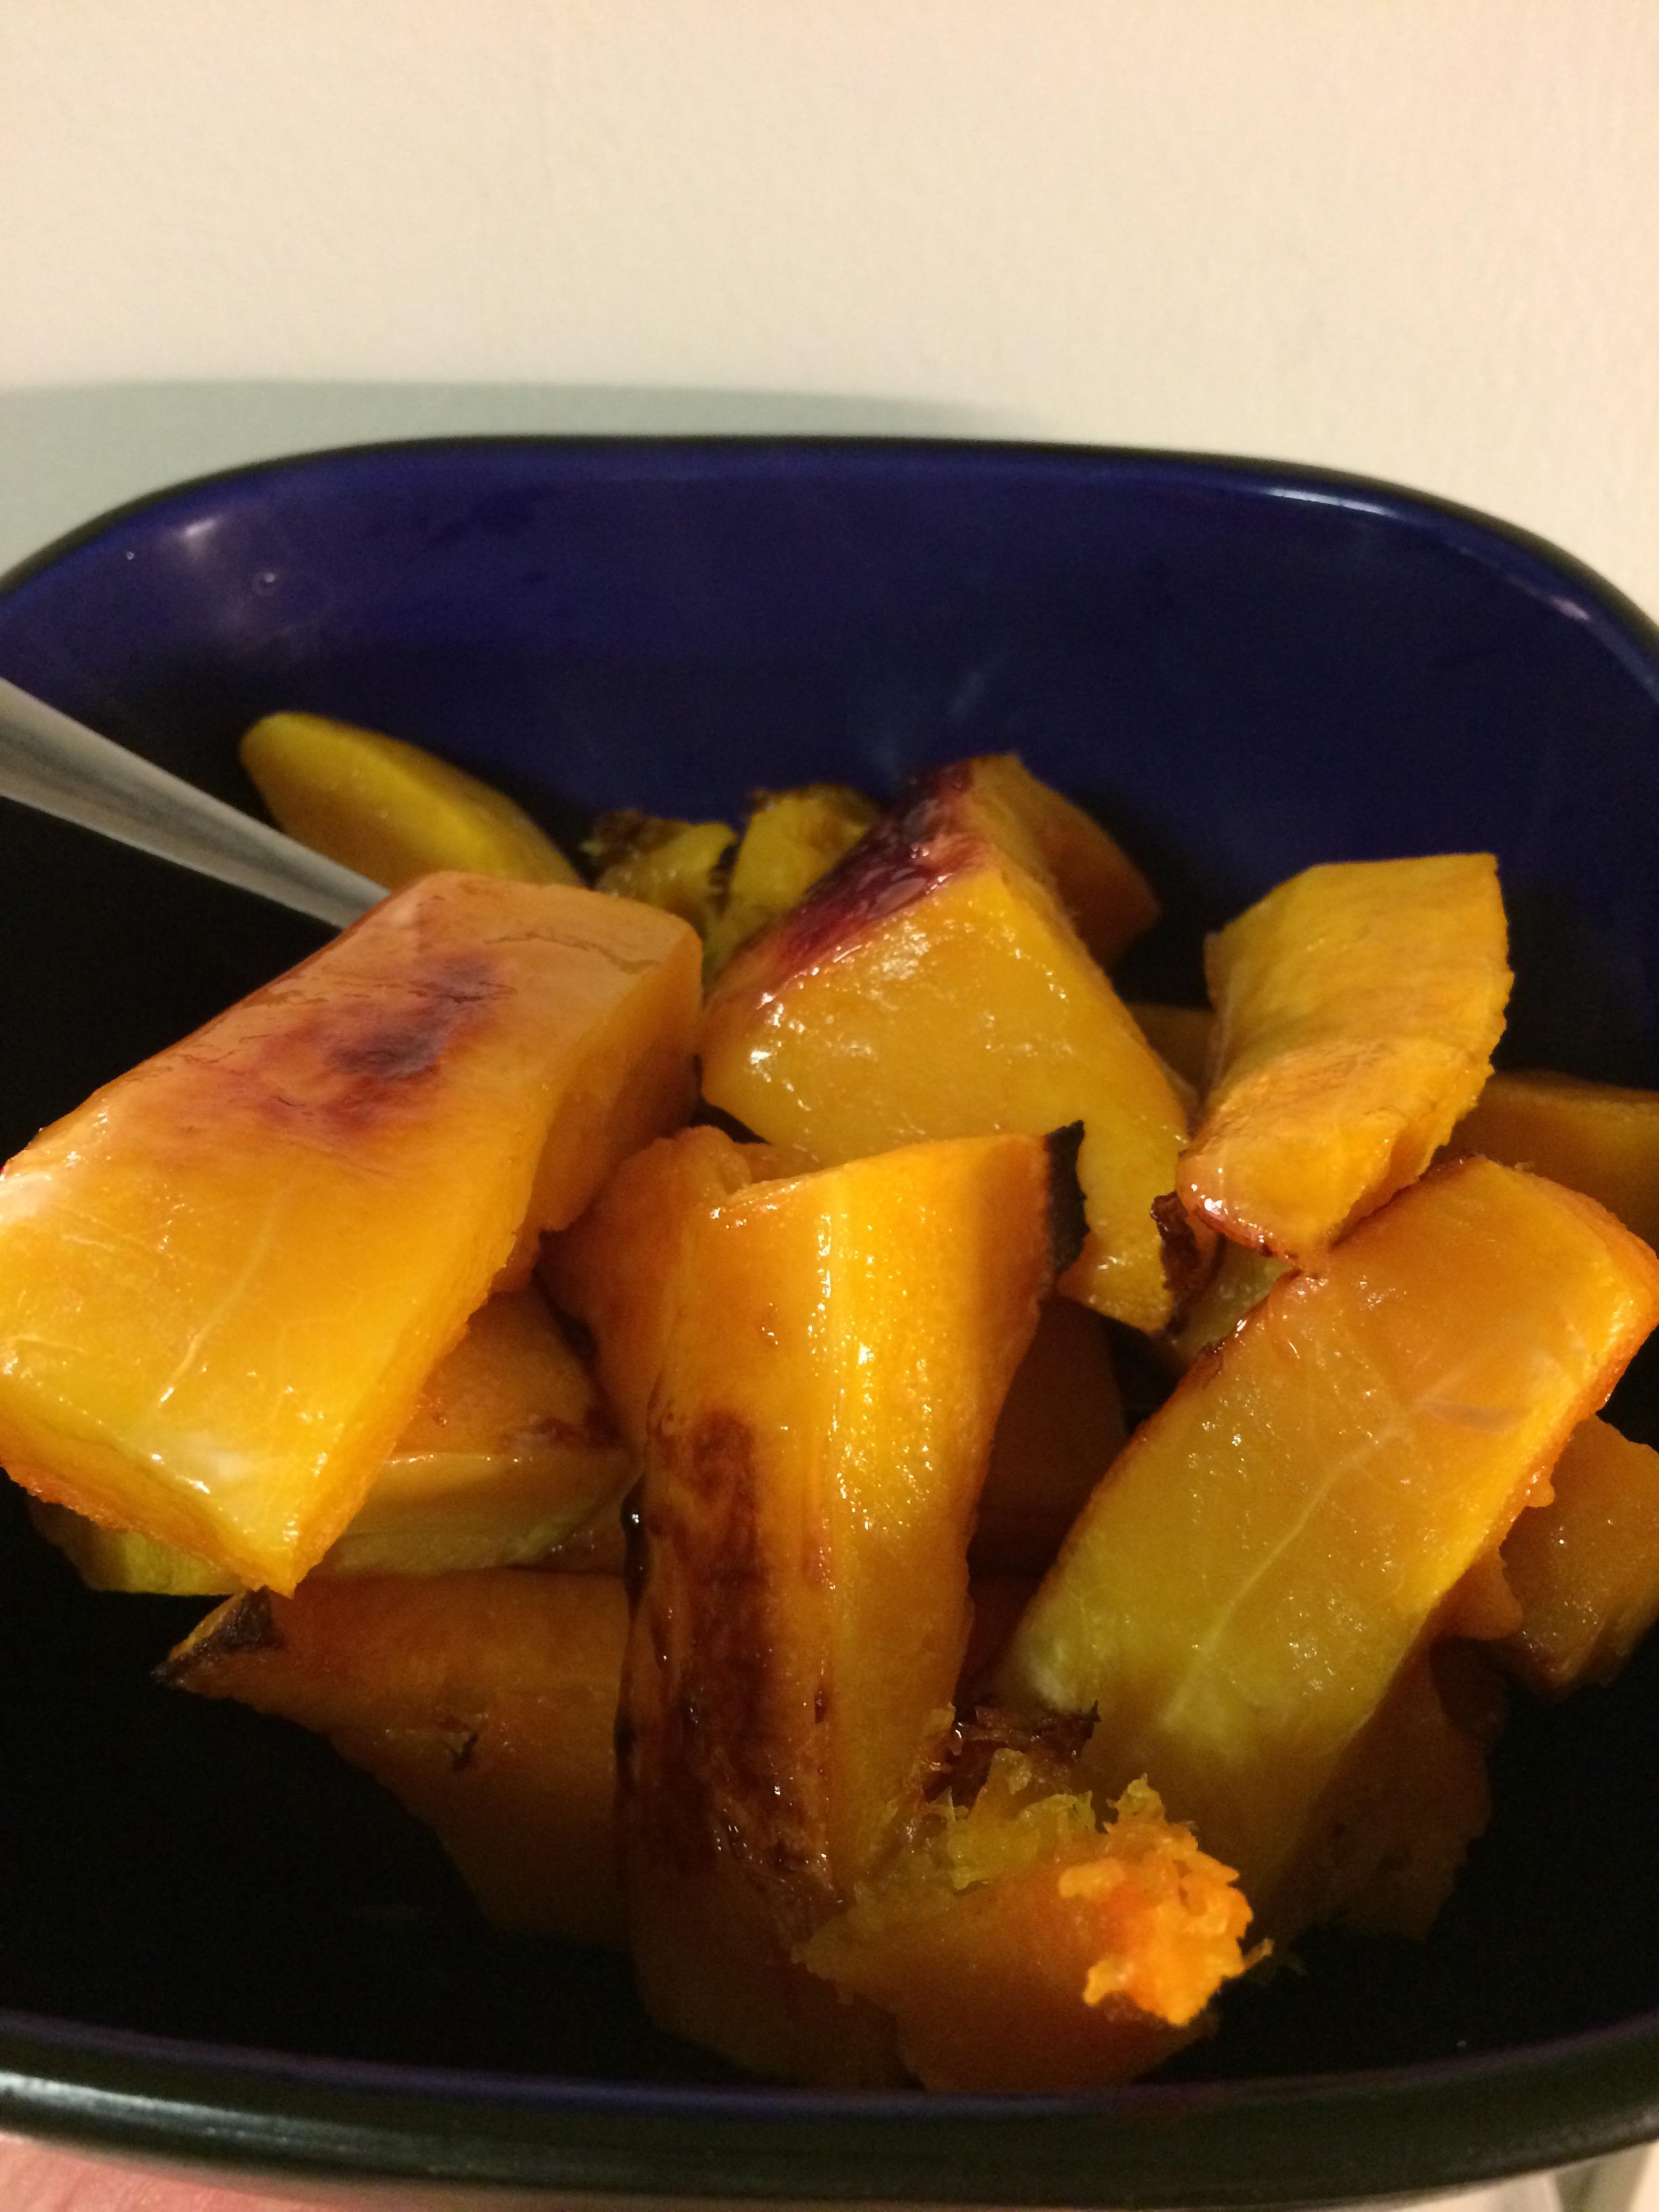
The other night at work the chefs roasted butternut squash, I had a piece and it was amazing. After grilling the chef that was on that night on what to do I thought I might give it a try, at home, with only the cat to supervise me…it may not have been my best idea but the house is still standing so it couldn’t have been the worst! 😉
As those of you who have read past cooking posts know, I have a teeny tiny kitchen with nooooo counter space to speak of so my cutting board gets balanced on the edge of the counter that is at the front of the sink and the middle part of the sink, it is a wobbly, dangerous, stupid, place to put a cutting board, but generally my best option. I’m pretty sure one of these days I’m going to slice in to my finger *rolls eyes* Tonight, I dropped the knife and almost stabbed my foot, oops! But I didn’t! So I’m counting that as a win…
After deciding I wanted to keep my feet and fingers intact I managed to find a better balancing spot and proceeded to do as the chef instructed. He said to chop the top and the bottom off, then peel the squash, then cut it in half so the round bulb part is separate from the top column shaped part. Then I slice open the bulb part to dig out the seeds and cut the entire thing in to pieces sized however I want them to be sized.
I’d love to say it went as smooth as it sounds like it should have but well hey, it wouldn’t be my kitchen if that happened, right? 😉
I don’t know if it is my peeler, or my technique, or what, but peeling that squash was not an easy task. I ended up using my knife and hacking away at the outside so my poor squash looked not quite as attractive as one might imagine a peeled squash could look. Cutting the top and bottom off was fine, cutting the entire thing down the middle was a tad harder…that could be due to my knife being too small but let’s not get picky about these things, ok? Then there was the whole digging out all the seeds and gross stuff from the bulb section, ugh, I always dislike that part of dealing with a squash, so slimy, so squishy, so easy to have a knife slip because maybe I started using the knife without getting all the goo off my hand…but again with the being picky!
So eventually I get my chopped up butternut squash on the baking tray and now the easy part. I had some oil in a little dish and I got to use my oft neglected pastry brush to spread the oil on the squash, then I sprinkled some brown sugar over top. At this point, or at some point, maybe not this point, I kinda forgot (oops again!) I was also supposed to sprinkle pepper, salt, and a Club House vegetable seasoning on the squash but (1) I was too lazy to get the pepper (2) I don’t add salt to anything so that wasn’t gonna happen and (3) I tried to buy the seasoning but the store didn’t have any so I was crossing fingers it wasn’t an intricate part of making the squash taste good.
While all this was going on the oven was heating to 350, it was sitting at its temperature for quite a while because yeah, this whole prep thing didn’t go quickly *rolls eyes* so in went the tray and on went the timer. I was told ten minutes, maybe fifteen, would be needed, and to stab the squash with a fork to test it. Also to remember what the squash looked like at work and wait till my squash looked the same.
Well…um…yeah…something went a tad wrong there. For starters, at the ten minute mark it was nowhere near done, so back in it went, in the end I think it took 40 minutes or so. Which is unfortunate because I was super hungry so that 40 minutes felt like an eternity. Even after all that time it didn’t look the same as the squash at work but it passed the fork test and I wasn’t willing to wait any longer…impatient much?
Also, I think maybe I should have flipped it at some point? The sugar kinda melted down so it was on the tray, leaving the topside of the squash pieces bare. Which is fine, except the squash was basically sitting in a brown sugar and oil lake so when I took the squash pieces off the tray there were strings of sugar, like gooey strings you’d see on a caramel apple or, I dunno, a caramel filled chocolate…not that I don’t like sugar but what I was seeing seemed a tad excessive. The underneath side had a nice browning effect to it, thanks to sitting in the sugar, where as the top was the same colour as it started out as. Not as pretty as the roasted butternut squash at work. Then again, those chefs went to school for who knows how long, their food better look nicer than mine! 😛
In the end it was edible, actually, it was more than edible, it tasted good. Not as good as what I was trying to recreate but that could be due to the lack of seasoning, or too much sugar, or the wrong cooking temp and time, or the simple fact that I made it…but it wasn’t so horrible that I won’t try again, and hopefully get better results next time!